Today’s post is from our regular Tuesday contributor, Sally.
I am the first to admit that I am by no means a crafty person. I try. I make attempts. Usually they’re utter failures, but hey, at least I’m trying something new right?
I’m currently living in an apartment that is located in one of the residence halls on the campus I work for. The building itself was originally built in 1915 and was remodeled/added to in 1941. Work has definitely been done since then and while you can tell it’s an old building, I’ve always loved this residence hall in particular because of its’ uniqueness.
My apartment is made up of a living room, bathroom, kitchen, and bedroom, and while I wish there some things I could change, I’m definitely a happy camper. I’ve been slowly doing some things to spruce up the place and my most recent attempt was in the bathroom.
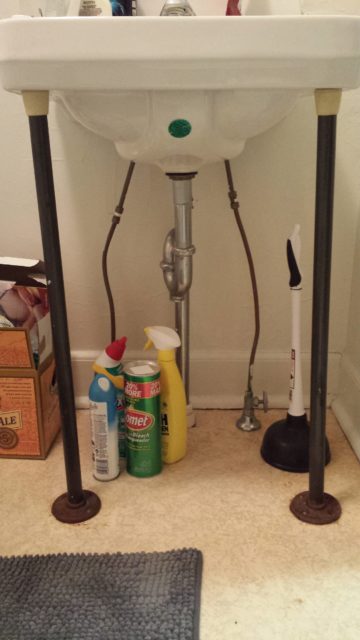
You see, I have this sink. And while it works and doesn’t look too bad, the rusty legs were killing me a bit. And having everything just sitting out in the open.

I didn’t need or want a different sink; I just wanted to cover the bottom of the sink. While I have no access to power tools or band saws or anything of the sort, I do, however, own a sewing machine. As well as have access to Pinterest. Both of these things are critical for myself when attempting to create something.
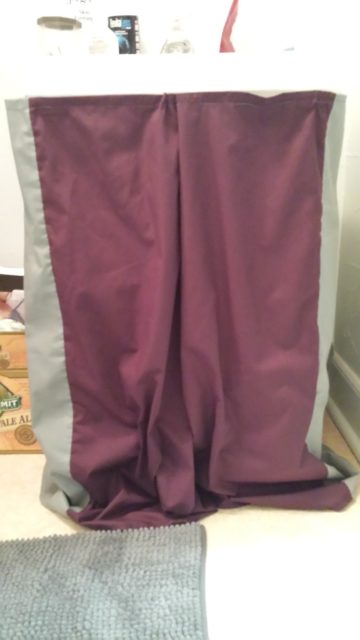
My goal was to create a sink skirt. It was a little bit of a struggle, I’ll admit….measuring and cutting are not my strong points! However, it turned out better than I thought it would.
My first mistake was not measuring the sink before I purchased fabric. While I had visions of appliqué and ruffles in my head, those soon were squashed when I realized I hadn’t purchased enough fabric nor wanted to drive another hour to get more. No matter though, as I simply improvised and did something much more simple.
 Once I figured out my new game plan, I definitely measured the sink before I cut my fabric. After cutting, it was off to the ironing board to prepare the fabric to sew it. No, I didn’t prewash my fabric. Sometimes I like being a rebel. Or I just forgot. No matter!
Once it was sewn, I then had to decide for sure how I wanted to attach it to the sink. In the end, I went with the 3m Velcro strips and I’m very happy with that decision! I simply slapped them to the sink, added them to the fabric (at first I just put them on, then I decided to hot glue them), put the curtain up and viola! No more rusty sink legs or having to look at the plunger – you can definitely tell my measuring skills are not great. I may have made them a tad too long but we’ll just go ahead and pretend that it makes them dramatic :)
It’s not the prettiest, but it definitely works for me. I’m feeling more confident so maybe in a few months when I have more free time, I’ll try to make some new ones so I can swap them out when the mood strikes, but right now, these are perfect.
The whole project only took me about two-three hours and cost me $15. I purchased inexpensive fabric that was also on sale; the Velcro strips are what was the spendy part!
Have you ever made sink curtains? What are some simple remodels/improvements you have made to your living spaces?
____________
Photo by Sally Bohlinger


That looks much better than the bare legs. I just made real curtains which was pretty easy since I found some wood looking rings you just have to cut a hole in the fabric and press to install. I made the mistake of not thinking about the holes should go and had to go buy some more rings for the corners but it doesn’t look too bad either!
I agree, I think it looks much better than the previous bare legs. We’re actually in the middle of redoing our master bath ourselves. We swapped services with a friend who has his own company that does tiling, showers and such and we built a new website for him. Now is the scary part – us finishing the bathroom. We’re not crafty at all, so it could get interesting. ;)
Looks great! I have a dinning room table that has a really scratched up surface. I don’t really care though becuase the table does the job-just doesnt look the prettiest. I had my mom sew me a table runner that completely covers the worst of the scratches. So I guess I didn’t make the table runner but it was still an easy solutuion to a cosmetic problem
I don’t think I could sew to save my life, but I am about to paint my laundry room. Luckily, you don’t need many skills to paint!
This is a great idea! I have a similar “antique” sink with no storage underneath. This would be a great solution.
Cool solution! Very creative.
I love your sink skirt and it is a great frugal solution for someone who needs covered storage. Great work!
Good for you! I’ve made sink curtains before at an office my Dad had briefly. I used a curtain panel and a stapler. Woot! Haha. It worked, though, and was a big improvement :-)
Nice work, it looks great. I once made a skirt for my old coffee table (to turn it into a TV stand). I hated looking at the DVD player, game console, wire etc, so I covered them all up with a pretty skirt I made out of a full size flat sheet. Frugal and functional.
Very nice! A few years ago I put in a cedar fence. It took forever because I wanted it to be perfect. But now 3 years later I still look outside with pride.